Factorio: Engineering Addiction
Week 5 — Transport and Defence
Transport options
Walking is the baseline every other option is measured against — each vehicle buys speed, cargo space, or both, at a different cost.
- the car trades a fuel slot for speed well above walking pace, with a small cargo hold — cheap and early, favoured for outrunning trouble
- the tank is slower and less maneuverable than walking, but carries a submachine gun, a flamethrower and a cannon — durability over mobility
- the train (next week) trades route flexibility for speed and cargo capacity over long, fixed distances
- the spidertron takes no fuel — its speed comes from exoskeleton equipment in its own grid, and it crosses terrain wheels can’t
Obstacle removal
Cliffs and water aren’t obstacles to route around forever — cliff explosives and landfill remove them permanently, at a deliberate resource cost.
- cliff explosives clear a cliff face outright, opening a route or building site that was previously blocked
- landfill converts water tiles to buildable land, at the cost of the landfill material itself
- both are one-way: once placed, the terrain change is permanent, which makes it a genuine design decision, not a temporary fix
Biters, worms and nests
Enemy presence grows along an evolution factor from 0 to 1, driven by three independent things: time passing, cumulative pollution produced, and nests destroyed. All of it is driven by total pollution produced, not by how much of the cloud you’ve managed to contain.
- each source has a fixed weight per unit: time adds 0.000004/second, destroying a spawner adds 0.002 (same for every spawner type — not worms), pollution adds 0.0000009 per unit produced
- the three weighted totals are summed, then squashed into the 0-1 range
by
evolution_factor = total / (1 + total)— this is why evolution climbs fast early and crawls near 1.0, not a hand-tuned late-game curve
Evolution’s diminishing marginal effect
- the same action’s marginal effect shrinks as evolution rises: any
increase is multiplied by
(1 - evolution_factor)², so destroying a nest at evolution 0 adds the full 0.002, but the same kill at evolution 0.5 adds only a quarter of that, 0.0005
Pollution’s second job, and nest expansion
Evolution isn’t pollution’s only effect, and nests aren’t purely passive between attacks — both run on their own separate schedules.
- pollution has a second job: pollution reaching a nest triggers actual attacks, on its own schedule — containing the cloud reduces attack frequency even though it does nothing for evolution already accrued
- nests also expand on their own timer, claiming territory outward until they reach an occupied area — left alone, expansion fills every explored area
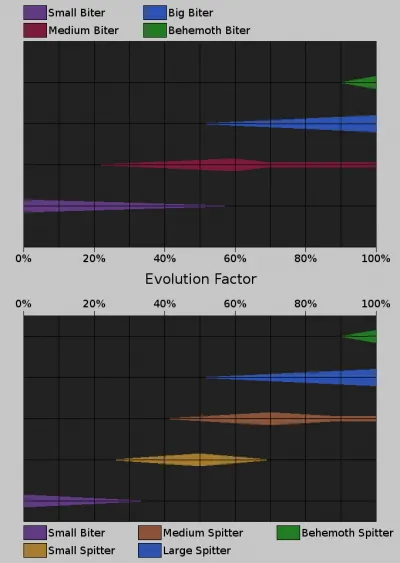
Evolution weights, in practice
Source: Factorio Wiki, CC BY-NC-SA 3.0.
Three independent tracks feeding one shared total — raising evolution from any one of them raises it for all of them, since the game only ever sees the combined number.
Biters, worms and nests, in practice
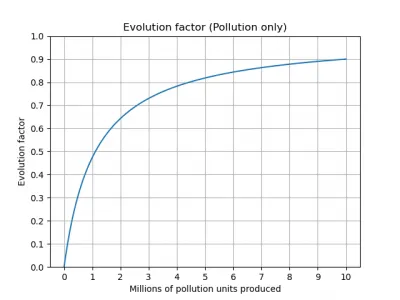
Source: Factorio Wiki, CC BY-NC-SA 3.0.
The curve flattens, it never resets — pollution already produced doesn’t un-produce itself, which is why the practical lever is producing less of it going forward, not cleaning up what’s already out there.
Reaching the same evolution factor, three ways
Any of the three sources alone can drive evolution to the same value — the numbers below are what each one takes on its own, holding the other two at zero.
evolution   pollution alone   time alone   destroyed spawners alone
   10%          123k             7.7 hrs           56
   50%         1.111M           69.4 hrs           500
   90%           10M           625.0 hrs          4,500
Reading the three-ways table
- reaching 50% evolution from time alone takes under three days of a world simply existing, running or not — the clock never stops
- reaching it from spawners alone means 500 kills, at a shrinking marginal gain per kill the closer you get — the last hundred cost far more than the first hundred
Evolution, in practice — by time
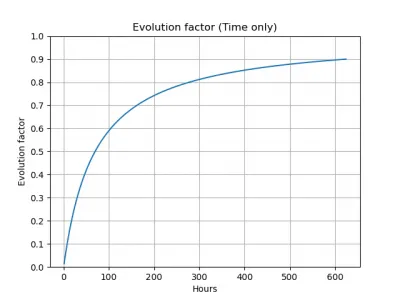
Source: Factorio Wiki, CC BY-NC-SA 3.0.
Same flattening shape as the pollution-only curve — every source feeds the same squashing formula.
Evolution, in practice — by spawners
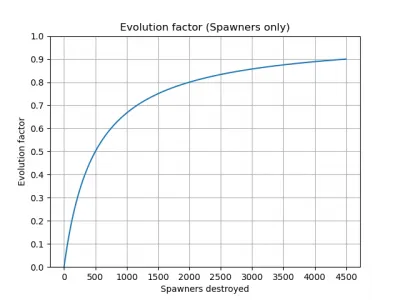
Source: Factorio Wiki, CC BY-NC-SA 3.0.
Every source produces the same diminishing-returns curve — this graph and the time-based one on the previous slide are shaped identically on purpose.
Nest expansion
Nests don’t just sit still producing pollution — they claim new territory on their own schedule.
- roughly every 60 to 4 minutes (the interval shrinks as evolution rises), a nest sends 5-20 units to found a new nest — the target chunk is picked within a 7-chunk radius by a score that only counts how many player structures and enemy spawners are nearby, never what those structures cost or how big they are
- that scoring is exactly why a single pipe run through open ground is an unusually cheap deterrent — it counts the same as a wall for suppressing expansion into that chunk, at a fraction of the resource cost
Nest attacks
Attacks run on a second, separate schedule, triggered by pollution rather than by a timer alone.
- once pollution reaches a nest, it musters a group and launches an attack roughly every 1 to 10 minutes
- if some of the mustered units haven’t arrived at the rendezvous point yet, the attack waits up to an additional 2 minutes for stragglers before going anyway
Biter pathing
Biters heading to attack a target take the shortest path that accounts for terrain, but not for player-built obstacles like walls — what happens next depends on how much detour those obstacles cost.
- if there’s a clear route around an obstacle that isn’t much longer, the group takes it and never touches the obstacle at all
- if there’s no clear route around, or going around would mean a large detour, the group attacks whatever is blocking the direct path instead
The maze tactic, and breaking off early
- this is exploitable on purpose: a maze of walls with no clean way around forces an attacking group through a chosen corridor, tower-defense style — the tactic only works because the detour-cost rule is real, not because biters are simply attracted to walls
- a biter that comes within range of a military structure or unit while travelling breaks off early and attacks that instead, using the same shortest-path logic against the new, closer target
Turret creep
Turret creep is an offensive tactic: advance on a nest by placing turrets just ahead of the last ones, retreating after each placement, until the turrets are close enough to kill it.
- a gun turret’s 18-tile range already beats every biter’s melee reach and a behemoth spitter’s 16-tile spit — a turret line wins that engagement once placed; creep exists only because turrets must be built within the player’s own reach, not because they’re outranged
Turret creep: the worm exception
- worms are static, don’t chase, but outrange the turret that’s meant to counter them — small worms reach 25 tiles, medium 30, big 38, behemoth 48, all well past 18. A worm gets to shoot first and keep shooting throughout the whole creep-in; the turret doesn’t return fire until it’s already inside the worm’s range, not the other way round
Turret creep: damage math
- piercing rounds do 8 damage/shot at 10 shots/second — 80 DPS per turret, enough to drop a freshly-spawned 350 HP spawner in under five seconds. The same math against a max-evolution 3,500 HP spawner takes ten times as long, which is the real reason creep stalls once behemoths show up: the spawner’s health scaled with evolution, the turret’s damage didn’t
- the placement limit forces a run-in, place, retreat cycle — turrets can only be placed within reach, so the line “creeps” forward rather than being planned from range
Turret creep, in practice
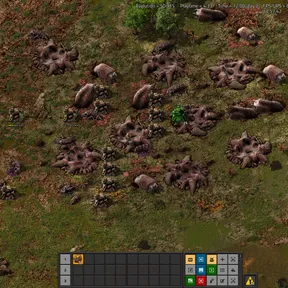
Source: Factorio Wiki, CC BY-NC-SA 3.0.
This is the “before”: no wall, no fixed line, just a nest cluster and a player about to place the first turret within reach of it — everything that follows is run-in, place, retreat, repeated.
Worms
Worms are static — never chasing, expanding, or leaving their spawn tile — but everything else about them is built to punish getting close.
- worm tier is gated by evolution during expansion (map-generated worms ignore this): medium needs evolution ≥0.3, big ≥0.5, behemoth ≥0.9 — the further from the starting area, the stronger the worms map generation places regardless of current evolution
- range climbs sharply by tier: small 25 tiles, medium 30, big 38, behemoth 48 — every tier already clears the gun turret’s 18-tile range
- big and behemoth worms resist up to 70% of fire damage, and behemoth worms resist 80% of laser damage — a flamethrower or laser line built for biters and spitters underperforms badly against a worm nest by comparison
Worms, in practice

Source: Factorio Wiki, CC BY-NC-SA 3.0.
It never advances and never retreats — every worm engagement is decided by whether you can close 25-48 tiles of open range before it decides you’re in range of it.
Firepower and kiting
- walls only block melee contact, not projectile or spit damage — big and behemoth biters reach 1.5 tiles regardless of a single wall layer, and a spitter’s 13-16 tile spit range makes a wall irrelevant to it entirely
- a spitter’s acid puddle outlasts the hit that made it: every tier’s puddle sits for 32 seconds, doing 7.2 acid/second for the small tier up to 360/second for the behemoth tier, and slows anything standing in it by 30-60% for 2 seconds per contact — the puddle, not just the projectile, is what makes standing still in a spitter fight expensive
Kiting and laser upkeep
- kiting uses a vehicle’s speed to stay outside an enemy’s attack range while still doing damage — useful against spitters and worms, whose ranged damage otherwise ignores your speed
- laser turrets trade ammo logistics for power draw: no supply chain to feed, but 1.2 MW while firing against 24 kW idle means a laser wall needs power headroom sized for a real attack, not just its average draw
Firepower and kiting, in practice
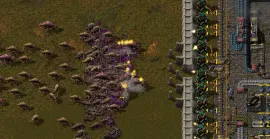
Source: Factorio Wiki, CC BY-NC-SA 3.0.
This is what a finished, static line looks like mid-attack — the wall stops nothing on its own, every bit of stopping power is coming from the turrets behind it.
Static defences and flamethrowers
A defensive line meant to sit in one place and hold indefinitely has a different job than turret creep’s advance — and a different weapon choice follows from it.
- flamethrower turrets deal damage in a spreading area rather than to one target at a time, so a mixed wave of small, medium and big biters dies faster per shot than the same wave against single-target gun or laser fire
- their fire also lingers on the ground briefly, keeping damage applied to anything still standing in it — a static line gets to spend that DPS on crowd density it doesn’t have to aim
Flamethrowers: trade-offs
- the trade-off is fuel logistics and range: flamethrower turrets need a piped fuel supply and have a minimum range, so they pair with — not replace — gun or laser turrets covering what’s too close to burn safely
- fire is a poor answer to worms specifically: big and behemoth worms resist up to 70% of fire damage (see the Worms slide), so a flamethrower line sized for a biter wave burns through nowhere near as fast against a nest defended by higher-tier worms
Static defences, in practice
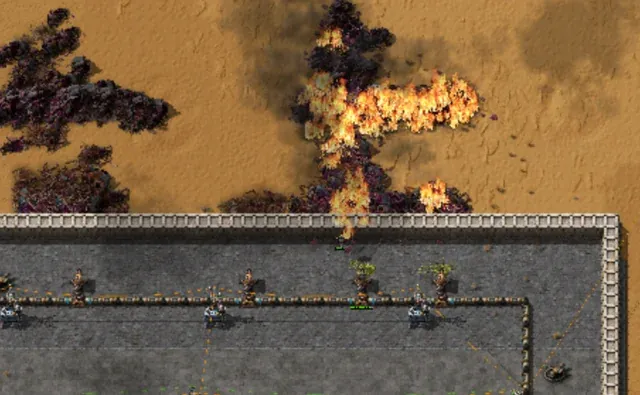
Source: Factorio Wiki, CC BY-NC-SA 3.0.
The fire keeps burning ground it already touched — that lingering area damage, not raw per-shot power, is what a static line is actually buying with the fuel cost.
Other tools
Not every threat is a straight firepower fight — poison capsules and combat robots solve problems that turrets and guns don’t.
- poison capsules deal heavy damage to worms specifically — spawners aren’t affected by poison damage at all, so this is a worm tool, not a nest-clearing one — with far more range than a grenade, the direct answer to a worm a player can’t safely walk up to
- combat robots (defender, distractor and destroyer, in rising cost order) follow the player or hold position and fight automatically, useful for soaking or distributing damage during an attack run on a nest rather than tanking every hit personally
- neither replaces firepower — both exist to change where the damage lands, buying survivability during an approach a straight gunfight wouldn’t allow
Walling off a threat isn’t clearing it. It’s scheduling it for later, with interest.
Evolution keeps accruing on its own timer whether or not you’re looking at it — postponing a nest doesn’t shrink the bill.
This week’s practical
Goal: destroy a biter nest with this week's tools, opening up access
Test: use at least one non-turret tool (vehicle, capsule, or terrain change)
Pass: the targeted nest is destroyed, not just suppressed; pollution and
      evolution state at the time of the attack is noted
Suppressing a nest behind a wall isn’t the goal here — the nest has to actually come down, and by a route that uses more than gun turrets alone.