Factorio: Engineering Addiction
Week 3 — Logistics I
Splitters
A splitter takes up to two input belts and up to two output belts and, by default, spreads items across the outputs 1:1. It’s the first of two components every balancer in this lecture gets built from.
- unfiltered, a splitter alternates which output gets the next item of each item type — it doesn’t look at lanes to do this, it tracks each item type independently
- set a filter and the even split stops being true at all: the filtered item goes entirely to its side, and the other side gets everything that isn’t the filtered item
- priority (when set) only decides who gets first claim on leftover throughput — it does nothing to items already covered by a filter
Underground belts
An underground belt pair crosses another belt, a pipe, or open space without a physical intersection — the belt goes underground at one end and surfaces at the other, with nothing to interact with in between.
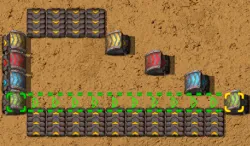
- basic (yellow) underground belts span a maximum gap of 4 tiles
- fast (red) stretches that to 6, express (blue) to 8 — each tier gains 2 tiles of range on top of the last
- exceeding the tier’s maximum gap breaks the pair — they stop linking, and the entrance just holds
Belt throughput
Speed and density together decide how much a belt can actually carry — “throughput” is just their product, and each belt tier only moves the number.
- belt speed is 1.875, 3.75 and 5.625 tiles/second for basic (yellow), fast (red) and express (blue) respectively — each tier moving exactly twice as fast as the last, then half again
- every belt holds up to 8 items per tile at full density, so max throughput is 15, 30 and 45 items/second for the same three tiers
- an underground belt pair stores whatever’s in transit between its two ends: at its maximum 4-tile gap a basic pair holds up to 44 items, an express pair at its maximum 8-tile gap holds up to 72 — that stored buffer is invisible until the entrance is blocked and it starts backing up
Underground belt tiers, in practice
Source: Factorio Wiki, CC BY-NC-SA 3.0.
The gap grows by 2 tiles per tier, but the buffer inside it grows faster than that — a longer, faster-moving belt segment holds more items in transit at once.
Belt sides
Every belt carries two independent lanes, left and right, that can hold two completely different items side by side without mixing. A splitter respects this: whichever lane an item entered on, it leaves on the same lane — a splitter changes which belt an item goes to, never which lane of that belt it’s on.
- this is why one lane of a belt can visibly clog while the other keeps flowing — a splitter downstream can’t touch the stuck lane to relieve it
- getting two items onto one belt, one per lane, is easy; splitting them back apart cleanly, each into its own single-item belt, needs one splitter per item and produces one full belt per item, not half a belt each
- splitters alone can never fix an uneven lane — moving an item off its lane needs a different kind of connection, covered next
T-junctions
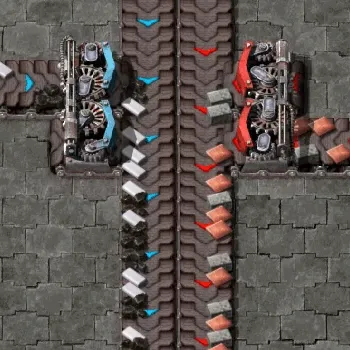
Run a belt into the side of another belt instead of through a splitter and you get a T-junction. Both lanes of the merging belt collapse onto a single lane of the belt it joins — a merge from the left lands entirely on the target’s left lane, a merge from the right lands entirely on the right.
- this is the move a splitter can’t make: a T-junction crosses lane content across the merging belt’s own left/right divide, feeding both into one lane on the other side
- combine it with a splitter (relocates whole belts freely, never touches lane identity) and the two together can put any input’s content on any output’s lane — a splitter-only network never can
- merging onto a belt that’s already full doesn’t split evenly: only the upstream lane gets through, the far lane backs up behind it
T-junctions, in practice
Source: Factorio Wiki, CC BY-NC-SA 3.0.
Neither side’s supply ever reaches the other lane — that one-sided landing is the entire mechanic, and the entire reason it’s useful.
Inserters and belt sides
An inserter’s pickup and drop-off lane both depend on its rotation relative to the belt it’s working, not on where it stands.
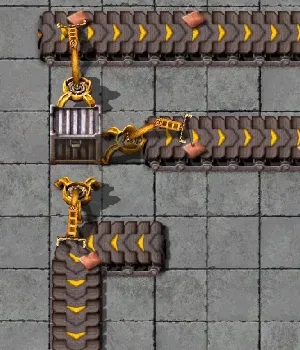
- drop-off: facing a perpendicular belt, it places on the far lane; facing a parallel belt, the right-hand lane
- pickup: on a perpendicular belt it prefers the near lane, the faster grab; on a parallel belt the left-hand lane
- curved sections add exceptions to both rules — treat these as the general case, not a guarantee
- rotating an inserter, or changing the belt behind it, can silently move which lane it reads or writes — a line starving one lane after a layout tweak is usually this
Inserters and belt sides, in practice
Source: Factorio Wiki, CC BY-NC-SA 3.0.
Every arrow here is the same rule applied at a different angle — worth tracing by hand once rather than memorising as a table.
Belts on the circuit network
A belt can report what’s on it to a circuit network — the connection this week’s balancer theory has been silently assuming doesn’t exist yet.
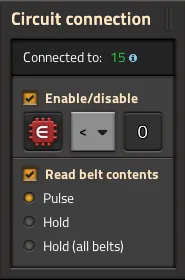
- Enable/disable: gate the belt itself on a condition — the belt stops moving items when the condition isn’t met, same idea as gating an inserter
- read belt contents, in one of two modes: Pulse sends a signal for exactly 1 tick the moment an item enters the belt (a count of events), Hold sends the signal continuously for as long as matching items remain on the belt (a count of what’s currently there)
- a third variant of Hold mode reads the entire connected belt line, counting through underground belts but not across a splitter or a sideloaded belt — connectivity for this purpose isn’t the same as connectivity for items
Belts on the circuit network, in practice
Source: Factorio Wiki, CC BY-NC-SA 3.0.
A worked example
Source: Factorio Wiki, CC BY-NC-SA 3.0.
This is Hold mode read directly into a combinator condition — the combinator’s output changes exactly when the watched item is physically present on the belt, and reverts the instant it isn’t.
Buffers
A buffer — a chest, or just a length of belt used as rolling storage — absorbs the gap between a process that produces in bursts and one that consumes at a steady rate, or the reverse.
- a buffer doesn’t fix a throughput mismatch, it only delays when the mismatch becomes visible
- sized too small, it empties or fills before the spike ends and the mismatch shows up anyway
- useful wherever a machine’s rhythm doesn’t match its neighbour’s — a batch process feeding a continuous one is the common case
Balancers
A balancer is expected to balance both belts and lanes — every output belt gets an even share of the input, and both lanes of every belt in the network stay even too. Model the network as a graph: splitters and T-junctions are nodes, belts connecting them are edges. Splitters move whole belts of content around and always split it evenly, but never cross a lane; T-junctions cross lanes, but only by collapsing a belt onto one lane of whatever it joins. A real balancer’s graph needs both node types — a splitter-only graph can balance every belt and still be carrying a lopsided left/right split the whole time, because nothing in it was ever able to fix one.
- a balancer is throughput-unlimited only if it meets both: 100% throughput when every input and output is in use, and any subset of inputs can still fully supply any subset of outputs — most hand-built arrangements satisfy the first and quietly fail the second
The 4-to-4 balancer
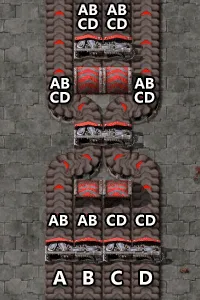
The standard 4-to-4 balancer is the textbook case for the throughput condition: a splitter-only graph model says 4 splitters are enough, and they are, for full load. But with only some inputs and outputs active, two of the four outputs turn out fed by only one splitter each — capped at one belt’s worth between them even though two full belts feed that splitter.
- the fix adds two more splitters purely to remove that internal chokepoint — 6 splitters, not 4, for a 4-to-4 balancer that’s actually throughput-unlimited; the general formula for larger power-of-2 sizes is n·log₂(n) − n/2 splitters
- that formula counts splitters, not T-junctions — it answers “does every belt get an even share,” a separate question from “does every lane,” and a design only earns the name “balancer” once both are true
Balancer graph, in practice
Source: Factorio Wiki, CC BY-NC-SA 3.0.
Read the labels top to bottom — that’s the splitter half of the graph made visible, one splitter mixing two inputs at a time until every output carries a share of all four. A real build still needs T-junctions worked into this same structure to answer for the lanes.
A balancer that only works when every belt is full isn’t balanced. It’s lucky.
The whole point of the throughput-unlimited condition is that luck isn’t a design.
This week’s practical
Goal: 5-belt-to-4-belt balancer, splitters and underground belts only
Test: starve one input lane at a time
Pass: all four outputs stay even regardless of which input is starved
A balancer that passes with all five inputs full and fails with one starved looks identical to a working one until you actually test it — test it.